
Have you ever watched a live stream where half the screen was filled with ugly black bars? Or tried to view a wedding ceremony on your phone only to squint at a tiny rectangle in the middle of your screen?
You're not alone. Video aspect ratio is one of those technical details that most people don't think about - until it ruins their viewing experience.
Here's the good news: getting your aspect ratio right isn't complicated. In fact, once you understand the basics, you'll wonder why it ever seemed confusing in the first place.
Whether you're planning to live stream a personal or business event, choosing the right video aspect ratio can make the difference between a beautiful, professional-looking stream and a frustrating viewing experience.
In this guide, we'll break down everything you need to know about video aspect ratios - in plain English, without the tech jargon. By the end, you'll know exactly which format to use for your next live stream, and how to ensure your viewers get the best possible experience, whether they're watching on a phone, tablet, laptop, or smart TV.
What Exactly Is Video Aspect Ratio? (And Why Should You Care?)
Let's start with the basics.
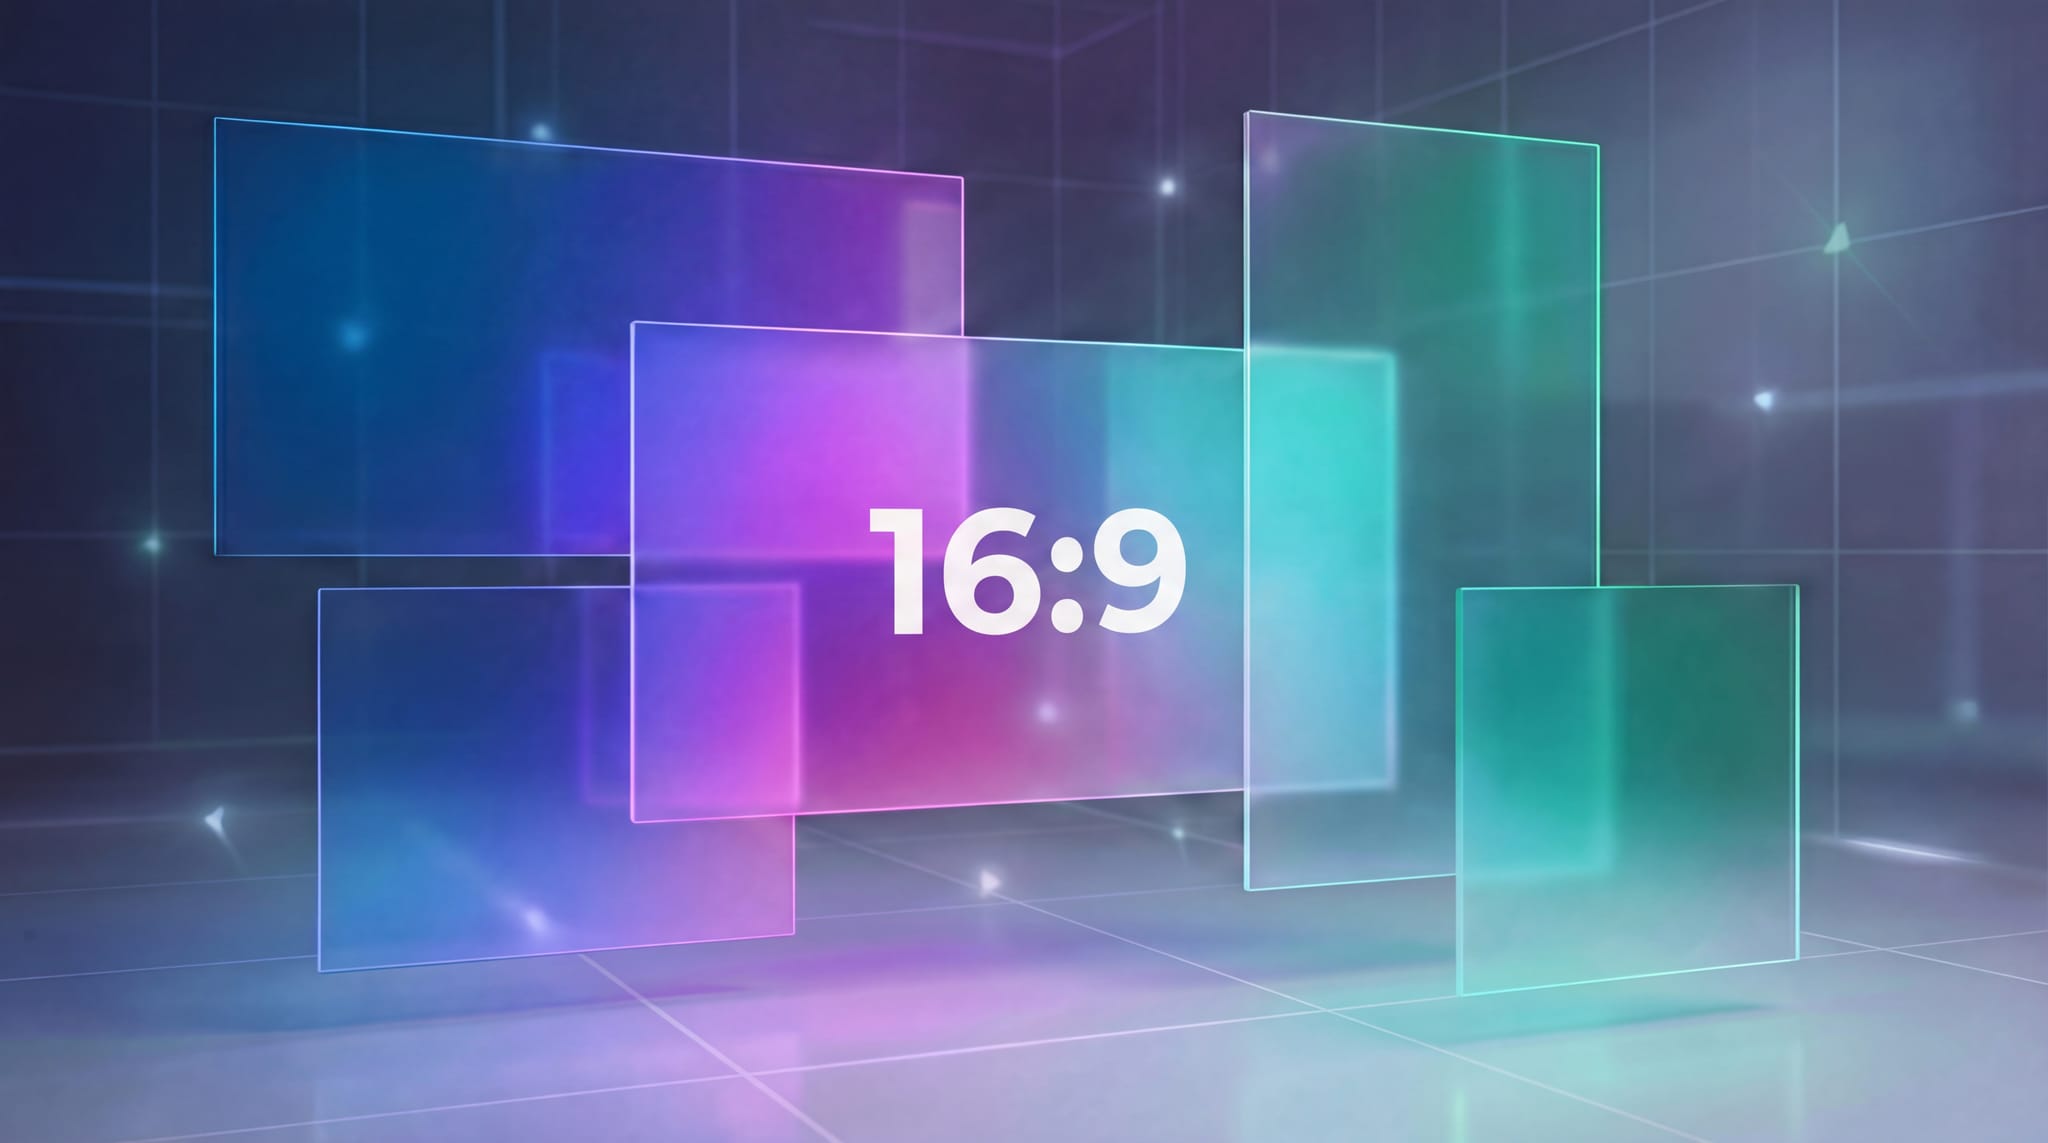
Video aspect ratio is simply the relationship between the width and height of your video frame. It's written as two numbers separated by a colon - like 16:9 or 4:3.
Think of it like this: If you're hanging a picture frame on your wall, you wouldn't force a square photo into a rectangular frame, right? The same principle applies to video. Your video's aspect ratio needs to match the screen it's being viewed on, or you'll end up with those annoying black bars or, worse, a cropped image that cuts off important parts of your scene.
Why This Matters for Your Live Stream
Imagine you're streaming a wedding. You've positioned the camera perfectly to capture both the bride and groom at the altar. But because you chose the wrong aspect ratio, everyone watching on their phones only sees the middle third of the scene, the bride is cut off on one side, the groom on the other.
Frustrating, right?
Or picture this: You're sharing a memorial service with elderly relatives who aren't tech-savvy. They're trying to watch on their iPad, but the video appears as a tiny strip in the center of their screen, surrounded by black bars. They can barely see anything, and they're struggling with the technology when they should be focusing on the moment.
Getting the aspect ratio right means:
- Your viewers see everything you intended them to see
- The video looks professional and polished
- No one has to rotate their device or fiddle with settings
- Everyone can focus on the moment, not the technology
The Evolution of Video Aspect Ratios: A Quick History Lesson
To understand where we are today, it helps to know how we got here.
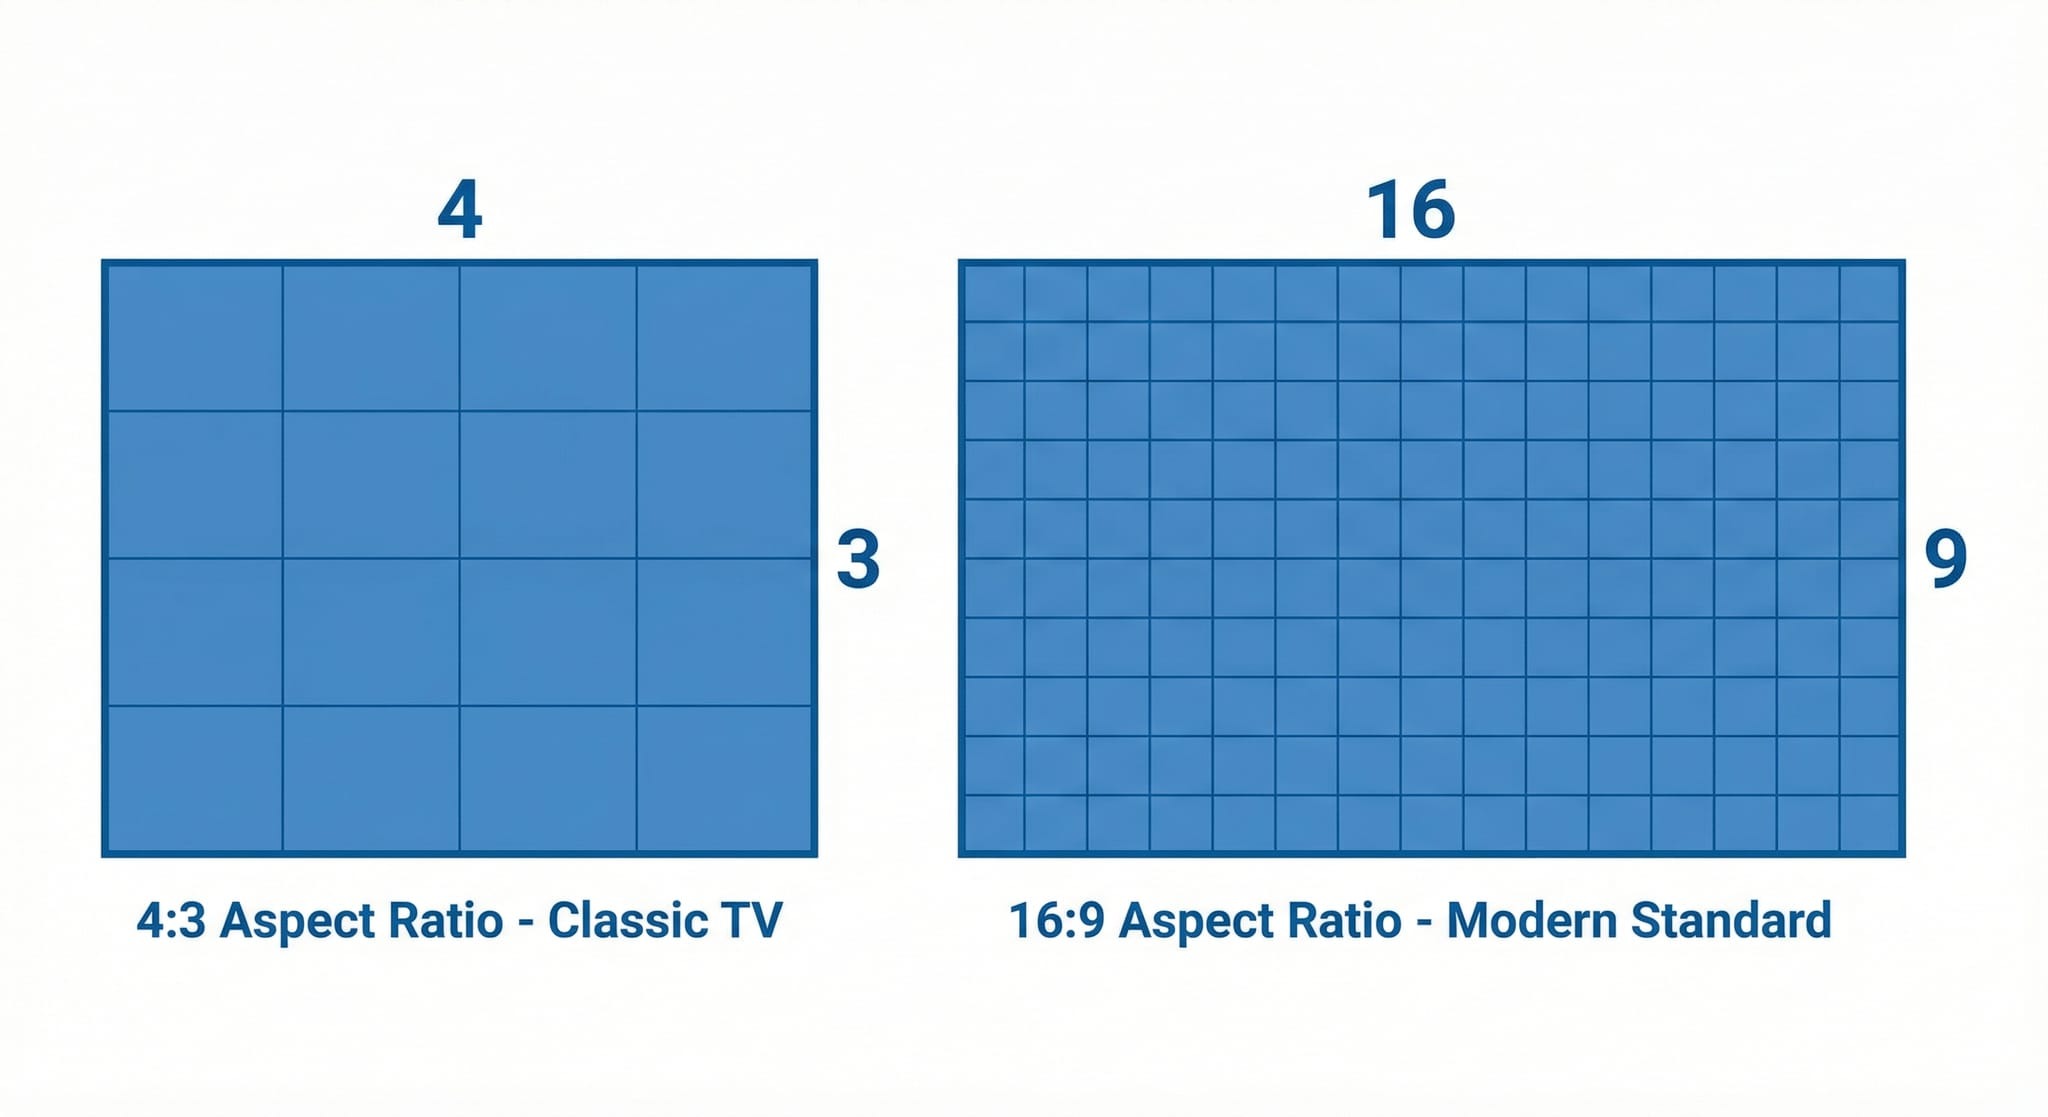
The 4:3 Era (1940s-2000s)
Remember those old, boxy television sets your grandparents had? Those used a 4:3 aspect ratio - meaning the screen was 4 units wide for every 3 units tall.
This was the standard for decades. It worked great for early TV shows and computer monitors. In fact, if you're over 30, you probably grew up watching cartoons on a 4:3 screen.
But there was a problem: movie theaters used wider screens to create that "cinematic" feel. When movies were shown on TV, they either had to be cropped (cutting off parts of the picture) or shown with black bars on the top and bottom.
The Widescreen Revolution: Welcome to 16:9
As technology advanced and flat-screen TVs became affordable, the world shifted to 16:9, a wider format that's 16 units wide for every 9 units tall.
This became the international standard because:
- It better matches how we naturally see the world (our vision is wider than it is tall)
- It works perfectly for movies and modern TV shows
- It fits most modern screens—from smartphones to smart TVs
According to the Society of Motion Picture and Television Engineers (SMPTE), 16:9 has been the broadcast standard since the early 2000s and remains the most universally compatible aspect ratio for digital content.
Today, 16:9 is what you'll find on:
- Your laptop screen
- Your flat-screen TV
- YouTube videos
- Most professional broadcasts
- Netflix and other streaming services
For live streaming your events, 16:9 is almost always your best choice. It's what your viewers expect, and it works seamlessly across virtually every device.
The Smartphone Surprise: 9:16 Makes a Comeback
Here's where things get interesting.
A few years ago, if you filmed a video holding your phone vertically (in 9:16 or "portrait" orientation), you'd be mocked mercilessly online. "Turn your phone sideways!" people would yell.
But then something changed: TikTok, Instagram Stories, and Snapchat.
These apps are designed specifically for vertical video—because that's how people naturally hold their phones. Suddenly, 9:16 wasn't just acceptable; it was preferred for certain types of content.
So which should you use?
It depends on your audience and platform:
- Planning to stream a formal event (wedding, graduation, memorial service)? Use 16:9. Most people will watch on laptops, tablets, or TVs.
- Sharing a quick, casual moment on Instagram Stories or TikTok? 9:16 works great.
- Want maximum compatibility across all devices? Stick with 16:9.
Aspect Ratio vs. Resolution: What's the Difference?
This is where people often get confused. Let's clear it up once and for all.
Aspect ratio describes the shape of your video (the proportion of width to height).
Resolution describes the quality of your video (the actual number of pixels).
Think of it like this:
- Aspect ratio = the size and shape of a picture frame
- Resolution = how detailed and sharp the photo inside that frame is
Common Resolutions for 16:9 Videos
If you're using the 16:9 aspect ratio (which we recommend), here are the resolution options you might encounter:
Standard Definition (SD) - 480p
- Resolution: 640 × 480 pixels
- Quality: Looks okay on small phone screens, but pixelated on anything larger
- When to use: Only if you have extremely limited internet bandwidth
High Definition (HD) - 720p
- Resolution: 1280 × 720 pixels
- Quality: Clear and sharp on most screens
- When to use: Great for live streaming when you want good quality without huge file sizes
Full HD - 1080p
- Resolution: 1920 × 1080 pixels
- Quality: Crisp, professional-looking video
- When to use: This is the sweet spot for most live streams—excellent quality that works on all devices
4K Ultra HD - 2160p
- Resolution: 3840 × 2160 pixels
- Quality: Incredibly detailed, cinema-quality video
- When to use: Only if you have high-end equipment and excellent internet connection, and most viewers won't notice the difference on smaller screens
Common Aspect Ratio Mistakes (And How to Avoid Them)
Even with the best intentions, it's easy to make mistakes when setting up your live stream. Here are the most common errors we see - and how to fix them.
Mistake #1: Filming Vertically for a Horizontal Event
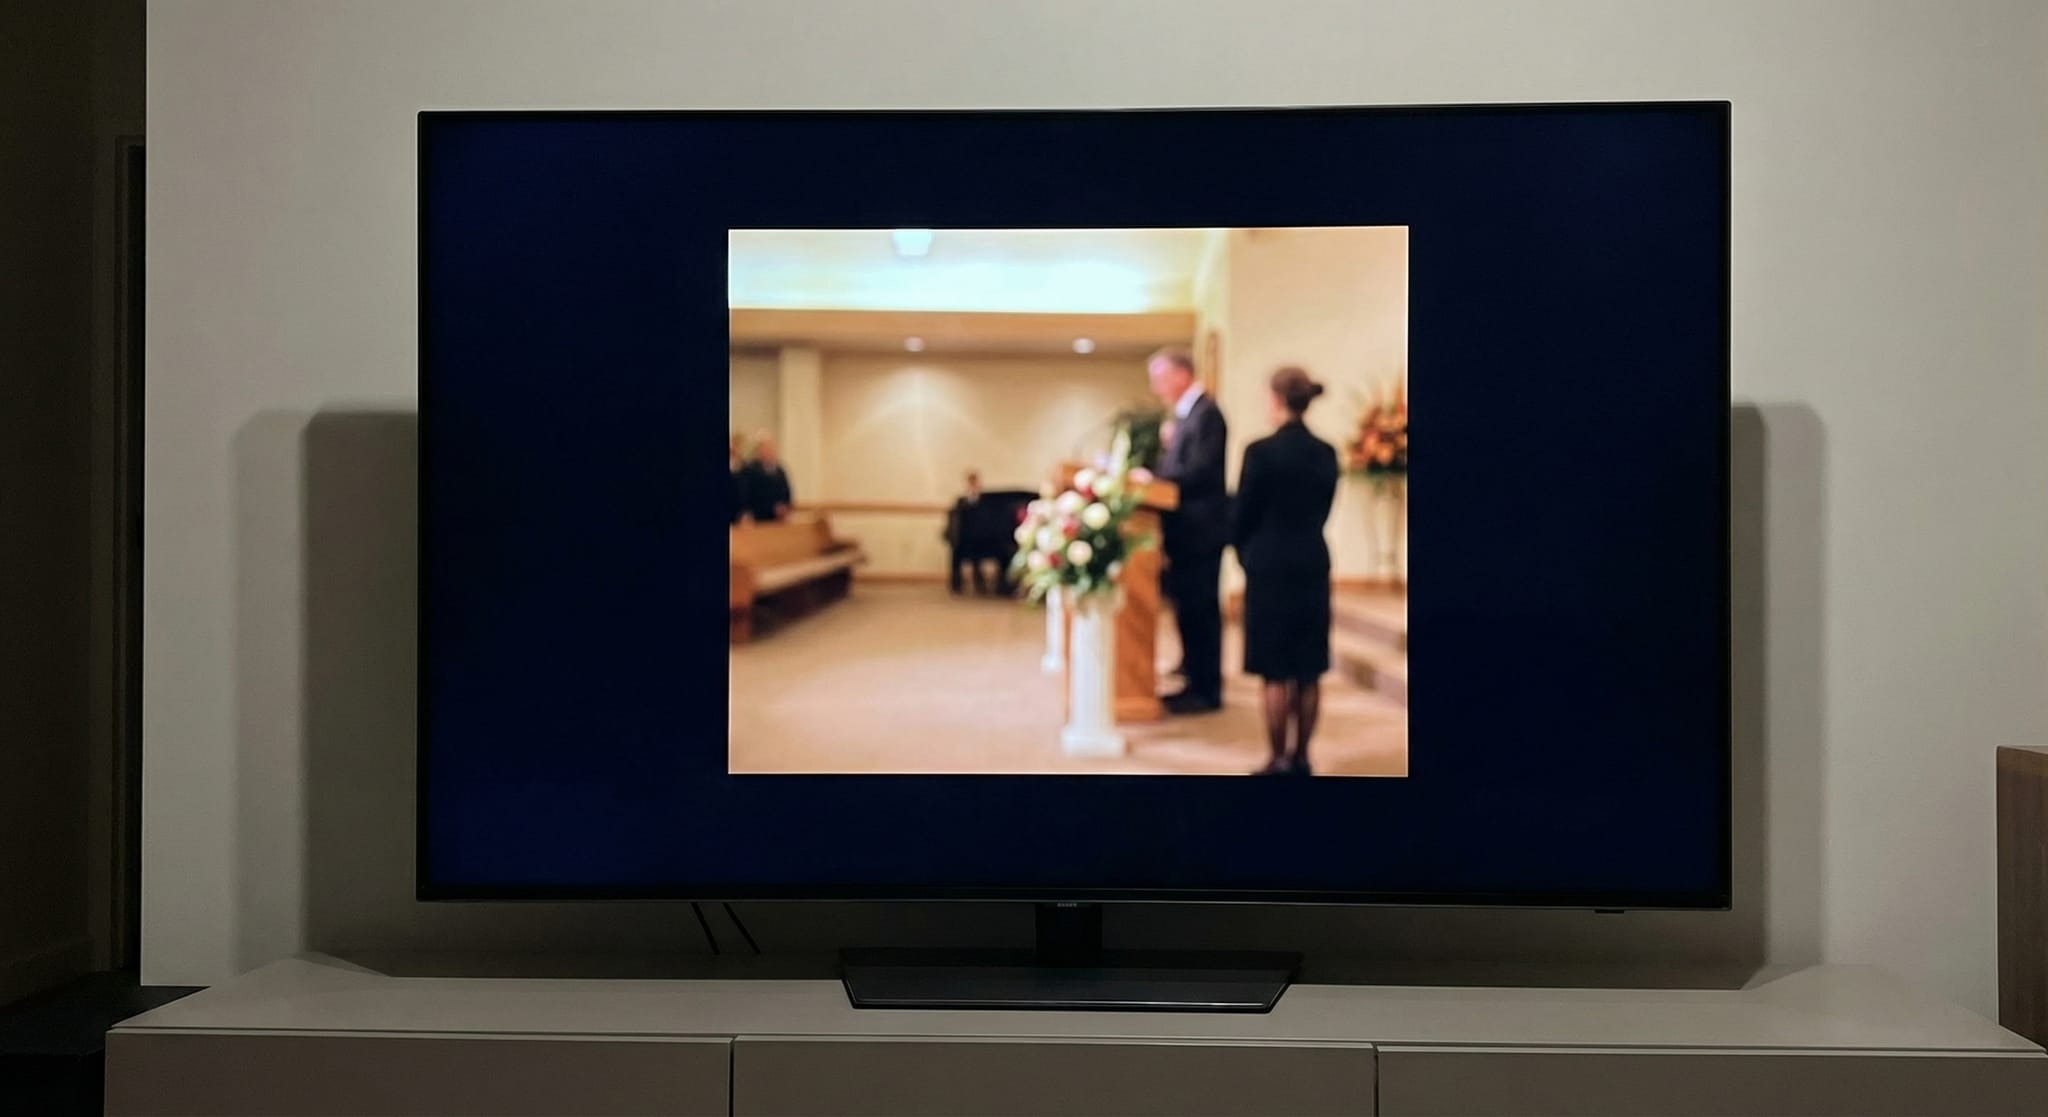
What happens: You hold your phone upright (vertical) while streaming a wedding ceremony. Your viewers see huge black bars on both sides of the video, with the actual content squished into a narrow strip in the middle.
The fix: Hold your phone sideways (horizontal) for any formal event or scene with multiple people. This creates the standard 16:9 format that fills screens properly.
How to remember: If your event involves people standing, sitting, or moving side-to-side, film horizontally. If it's just one person talking directly to the camera (like a selfie-style video), vertical might work for social media.
Mistake #2: Changing Orientation Mid-Stream
What happens: You start streaming horizontally, then accidentally rotate your phone to vertical (or vice versa). Your viewers see the image rotate, creating a disorienting, unprofessional effect.
The fix: Lock your phone's orientation before you start streaming. On iPhone, swipe down from the top-right corner to access Control Center and tap the lock icon. On Android, use the quick settings menu to lock rotation.
Pro tip: If you need to show something specific that requires rotating your phone, stop the stream, rotate, and restart. Don't try to rotate while live.
Mistake #3: Not Testing Beforehand
What happens: You set up your stream, hit "go live," and only discover after the event that your aspect ratio was wrong—and the recording is ruined.
The fix: Do a test stream 24 hours before your event. Stream for 30 seconds, stop, and check the recording on multiple devices (phone, tablet, laptop). Make sure it looks good everywhere.
EventLive advantage: Our app makes testing easy. Create a private test event, stream briefly, review the footage, and delete it. No one sees it except you, and you get peace of mind knowing everything will work perfectly for the real event.
Mistake #4: Prioritizing Social Media Over Quality
What happens: You film your entire wedding in vertical 9:16 format because you want to post clips on Instagram Stories. The full video looks terrible on everyone's TVs and laptops.
The fix: Film your main event in horizontal 16:9. You can always crop portions of that footage to vertical later for social media. But you can't go from vertical to horizontal without losing most of your scene.
Mistake #5: Assuming "Square" Is Safe
What happens: You choose 1:1 (square) aspect ratio thinking it's a "middle ground" that works everywhere. Your viewers see black bars on all devices.
The fix: For live streaming events, forget square. Use 16:9. Square is great for static Instagram posts, but not for capturing live moments.
How Internet Speed Affects Your Aspect Ratio Choice
Here's something many people don't realize: your aspect ratio choice can impact how much internet bandwidth you need.
Larger video frame = more data = more bandwidth required
This means:
- 16:9 at 1080p requires more bandwidth than 16:9 at 720p
- 16:9 requires less bandwidth than 4:3 at the same resolution (because 4:3 has more total pixels)
- Lower resolution vertical video (9:16) uses less data than high-resolution horizontal
What This Means for Your Live Stream
If you have excellent internet (50+ Mbps upload speed):
- Stream in 16:9 at 1080p for gorgeous, professional quality
- Don't worry about data limits
- Your viewers will get crystal-clear video
If you have decent internet (10-25 Mbps upload speed):
- Stream in 16:9 at 720p
- Still looks great on most screens
- More reliable with fewer buffering issues
If you have limited internet (under 10 Mbps upload speed):
- Stream in 16:9 at 480p
- Quality won't be as sharp, but everyone can still see what's happening
- Focus on stable connection over highest quality
EventLive automatically adjusts: Our adaptive streaming technology detects your internet speed and optimizes your video quality in real-time. You get the best possible picture quality without risking a disconnection or buffering.
Quick Internet Speed Test
Before your event, test your internet speed:
1. Go to Speedtest.net or Fast.com
2. Run the test
3. Look at your upload speed (not download—upload is what matters for streaming)
4. Use this guide:
- 20+ Mbps upload: Stream at 1080p
- 10-20 Mbps upload: Stream at 720p
- Under 10 Mbps upload: Stream at 480p or consider getting better internet
Maintaining a stable upload speed is more important than having the highest resolution. Learn more about bandwidth requirements for live streaming on our blog.
Advanced Tips: Taking Your Aspect Ratio Game to the Next Level
Once you've mastered the basics, here are some advanced techniques for power users:
Creating Multi-Platform Content
If you want to share your event across multiple platforms (EventLive stream + Instagram Stories + YouTube), here's the smart approach:
1. Film your primary stream in 16:9 using EventLive (horizontal orientation)
2. Download the recording after your event ends
3. Use simple editing tools (even your phone's built-in editor) to crop vertical clips for Instagram
4. Upload the full 16:9 version to YouTube or save as your archive copy
This way, you get maximum flexibility without compromising the quality of your main stream.
The "Safety Frame" Technique
Professional filmmakers use a technique called "safety frame" to ensure important content doesn't get cut off when videos are reformatted. You can apply this to your live streams:
When filming in 16:9:
- Keep your most important subjects in the center 60% of the frame
- Leave some "breathing room" on the edges
- If you later crop to square or vertical, nothing critical gets cut off
Example: When streaming a wedding ceremony, position the bride and groom in the center of your frame, not at the very edges. This ensures they'll remain visible even if someone's device displays the video slightly cropped.
Key Takeaways: Everything You Need to Remember

Let's distill everything we've covered into simple, actionable points:
1. Use 16:9 for almost everything
This horizontal format works on all devices and is the international standard for good reason. When in doubt, go horizontal.
2. Hold your phone sideways if using a smartphone
If you're streaming from a smartphone, turn it horizontal before you start. This creates the 16:9 aspect ratio automatically.
3. Don't change orientation mid-stream
Lock your phone's rotation before going live. Rotating during a stream creates a disorienting experience for viewers.
4. Test before the live stream
Do a trial run 24 hours before your event. Stream for 30 seconds, check how it looks on different devices, and make adjustments if needed.
5. Aspect ratio ≠ resolution
Aspect ratio is the shape of your video (16:9, 4:3, etc.). Resolution is the quality (1080p, 720p, etc.). Both matter, but they're different things.
6. 1080p and 16:9 is the sweet spot
For most live streams, this combination delivers professional-looking video that works everywhere without requiring massive bandwidth.
7. Vertical video has limited uses
9:16 (vertical) works great for Instagram Stories and TikTok, but it's not ideal for streaming full events. People don't want to hold their phones upright for an hour-long ceremony.
8. Your internet speed matters
Test your upload speed before streaming. If it's slow, you might need to reduce your resolution (but keep 16:9 aspect ratio) for reliable streaming.
9. Privacy settings are crucial
For intimate family events, use password protection to keep your stream private and secure.
10. EventLive handles the technical stuff automatically
You don't need to be a video expert. Our platform optimizes everything for you, so you can focus on capturing the moment instead of fiddling with settings.
Frequently Asked Questions
Q: What aspect ratio does EventLive use automatically?
A: EventLive automatically streams in 16:9 aspect ratio when you hold your phone horizontally. This is the universal standard that works perfectly on all devices—phones, tablets, laptops, and smart TVs. You don't need to change any settings; just hold your phone sideways and start streaming.
Q: Can I stream in vertical (9:16) format for Instagram Stories?
A: Yes, but we recommend using 16:9 (horizontal) for your main EventLive stream. After your event, you can download the recording and create vertical clips for Instagram Stories using simple editing tools. This way, you get the best of both worlds—a professional horizontal stream for most viewers, plus social media-friendly vertical clips for Instagram.
Q: Will my video look different on different devices?
A: When you stream in 16:9 (our default), your video looks great everywhere. Modern smartphones, tablets, laptops, and smart TVs are all designed for 16:9 content, so your stream fills the screen perfectly without black bars or awkward cropping. That's why we chose it as our standard format.
Q: What if I accidentally start streaming vertically?
A: If you notice you're streaming vertically (holding your phone upright instead of sideways), stop the stream immediately, rotate your phone horizontally, and start again. While it's not ideal to interrupt your stream, it's better than having the entire event recorded in the wrong format. That's why we always recommend doing a test stream beforehand!
Q: Do I need to worry about aspect ratio if I'm using a regular camera instead of a phone?
A: Most modern cameras default to 16:9, but it's worth checking your camera's settings before your event. Look in the video settings menu for options like "16:9," "widescreen," or "HD." If you see "4:3" or "standard," change it to 16:9. When in doubt, record a quick test clip and play it back on your TV or laptop to make sure it fills the screen properly.
Q: What's better: 720p or 1080p for live streaming?
A: If your internet upload speed is 15 Mbps or higher, go with 1080p for the sharpest video quality. If your connection is slower or less reliable, 720p is a better choice—it still looks great and is less likely to buffer or freeze.
Q: Can I change the aspect ratio after I've already streamed my event?
A: Unfortunately, no. Once you've recorded video in a particular aspect ratio, that's what you have to work with. You can crop the video later (for example, turning a 16:9 video into a 1:1 square for Instagram), but you can't expand it or change its fundamental shape. This is why testing beforehand is so important—you want to get it right the first time.
.png)
