
The event industry changed due to a global pandemic. This isn’t news, I know.
What might be news for you, is that pandemics shape how consumers behave in a permanent way. If you don’t want your business to be left behind, this guide should help.
We’re going to help you increase your profits like Ben, a wedding photographer whose weddings got canceled and managed to book 14 events in 3 months offering live streaming services.
If more money is not what you’re looking for, then you’ll also learn how to improve your customer experience and provide a service you can be proud of.
I’ll guide you through the gear you need, how to solve common audio problems, the best solutions, and how to include live streaming services in your packages.
Why should you offer Live Streaming to your clients?
The first and most important reason is well-known. They’re asking for it.
The second one? Most of your competitors are already doing it… and if they aren’t, they won’t be competitors for much longer.
Now… let’s focus on what’s important: your clients.
Offering live streaming services sends all the right signals to your leads. They’re looking for coverage for their event, and even if they aren’t asking specific questions about live streaming, they’re already familiar with it.
And you know what?
Familiarity sells.
You don’t have to explain a service they already know… they’ve been using Zoom for work meetings and birthdays for a long time now, and they’re sick of it. Aren’t you?
Nobody wants their wedding day to feel like another zoom meeting for your guests.
That’s why you have to show them that this is different. One-way live streaming means that grandma’s TV won’t be distracting everybody, or that “muting yourself upon entry” is not mandatory anymore.
But... let’s be honest.
Live streaming has always been pricey and complicated. That’s why most of us stayed away from it for so long.
That changed when YouTube allowed you to stream for free to unlisted pages (and then blocked your videos because you’re playing music…), and before then when Facebook offered to go to Live without even thinking about the fact that you don’t want strangers to watch or comment on your video. That was easily solved by creating a private group... Until people started deleting their Facebook accounts and couldn’t join the live stream anymore.
These days live streaming platforms are not only affordable, but they’re also a great business opportunity for anyone looking to adapt to the market needs.
TLDR: So.. the “why” should be clear by now, but let’s recap:
- Your clients are looking for live streaming vendors
- Your competitors are offering this, or they will be very soon.
- Your clients are familiar with the service, but they cringe every time they receive another Zoom invite.
- You don’t need to manage guests! Nor does your client.
- Social media platforms offer this service for free, with a few very important caveats.
- Live streaming platforms are not only affordable but also a great business opportunity.
How to add live streaming services to your business
I’m assuming you have a business… and a camera, right?
Depending on who you serve, the easiest way to start is to add live streaming services to your packages.
Why? I’m glad you asked.
With services such as EventLive, the cost involved in adding the service can be as low as $35 USD per event. I’m sure you’re making profits over that number, or you wouldn’t have a business.
So.. 35 bucks. What does that get you?
A complete live streaming platform that includes white labeling (add your logo and branding!), a service that simply works, unlimited free testing on location so you can verify how your setup works, and the same customer service as if you were paying 10x the real price.
How should you add this?
Ideally, it will be a part of the bundle and not a separate add-on. Let me show you why:
Here are the benefits of adding live streaming to your packages:
- Word of mouth is the biggest driver of work for service-based businesses.
But… how? When dozens or even hundreds of people join the live stream, they’ll see your logo on top. You can even add a link to your homepage. They can click on it and ta-da! you just earned a lot of new leads from your live stream. It’s like giving every single guest a business card, without the awkwardness.
- When your clients are comparing your services to the next vendor, it’s very likely that they’ll be selling live streaming services as an add-on, because they’re using very expensive platforms such as Vimeo. They have to pay a 900 USD subscription fee to get into the live streaming game. Do you want another automatic subscription added to your bills? I have enough of those already.
What if your competitors aren’t offering live streaming at all? It's simple: Your packages will stand out even more.
- You can up-sell later on and make extra money. If you include Live Streaming in your packages with the basic gear, you can then offer them a multi-angle live stream to improve the viewing experience for their family members back home. Does adding more cameras to your setup make you anxious? There’s another alternative: You can up-sell based on coverage. Most live streaming vendors offer services for a limited amount of time.
Let’s say you’re being hired to live stream a wedding. You could shoot the ceremony, pause for a break, and resume live streaming to the same link for the reception. And the best part? You can automatically notify all the virtual guests if you use EventLive.
How much should you charge for live streaming events?
“It all sounds great but I don’t do packages. I charge by the hour”, you might say.
Well, let’s help you.
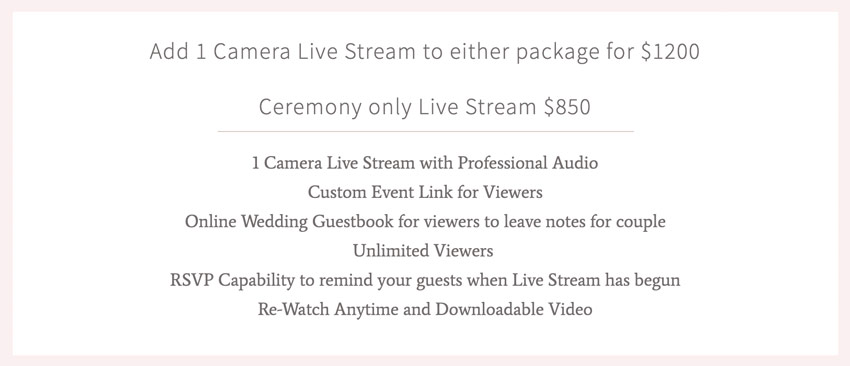
Live streaming as a standalone service sells for a minimum of $275 USD, but most people charge anywhere between 350 to 750 USD, for the basic setup.
What would that setup look like?
A phone, a mic, and a $99 gimbal. Any phone. Android or iPhone, it doesn’t matter: The better the phone, the better the quality you’ll get.
If you have professional gear, you can charge a lot more than that. Think about 800 to 1600 USD per service. We’ll discuss gear in a few minutes. Promise.
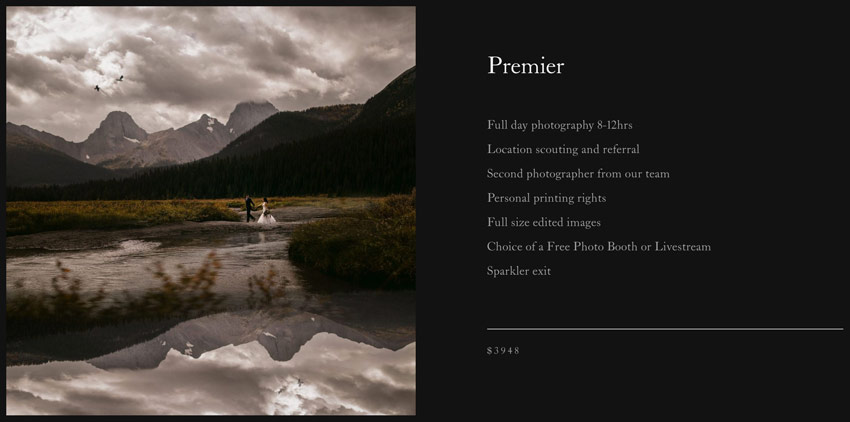
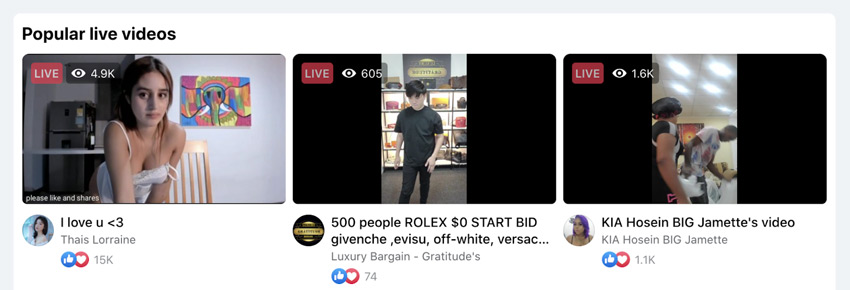
Here are a few examples of how videographers are offering Live Streaming services, so you can implement them in your own business:

How to choose a live streaming platform?
Choosing a live streaming platform is not an easy task, but it can be simplified quite a bit if you look at the most important aspects for all of them:
- It should provide solutions, even when the internet connection doesn’t work properly.
- It should stream video with great quality.
- It should allow guests to join without downloading apps or logging in.
- The number of attendees shouldn’t be limited. Can you imagine being locked out of your granddaughter’s wedding?
- It should offer human support for when things go wrong… because if you’re new to this, a helping hand can be a big difference.
- It should allow you to connect different devices: You wouldn’t be the first videographer to run out of battery or space on their phone.
- It should allow you to live stream private events with… privacy. No public links, no strangers commenting on your client’s funeral (Facebook has left the chat).
So… which alternatives do you have? Well, a lot of them to be honest. The problem is that many of them are so complicated that they are not even worth mentioning here.
Let’s start with the ones you know.
Youtube is great. We love it, and we use it every single day of our lives, both for work and for our personal projects. Here’s the deal: If you need assistance, you won’t find it. They have a knowledge base, but… is that what you need when you’re at an event and you don’t have audio? That’s the biggest reason most of our clients are switching from YouTube (well… that and the fact that they need 1.000+ subscribers to be eligible to live stream from the App). They will mute your video as soon as you start playing copyrighted music. Even if it’s in the background. Even if you’re not the one playing it. If you’re not that lucky, they won’t mute your video. They’ll simply take it down while your guests are watching at home.
Oh, and did I mention that they will display ads on your videos?

But wait, there are other alternatives out there. The next one that comes to mind is Facebook Live. If you didn’t delete your account when they leaked data of 533 million users, you might give this one a shot. They are not as fast as YouTube when taking down your live show, but they’ll make it public so anyone can join and watch that gender reveal, the one your clients expected to be private. If you manage to delete stranger’s comments in a timely manner, all you have to do is beg that the Live recommendations don’t include porn or gambling right next to your live stream.
I might sound a little negative with these comments, but we’ve heard all sorts of horror stories from our clients when we asked why they chose to work with us.
I’ll skip Instagram altogether because it’s not even worth mentioning, but here’s one that is: The old, trusty, pandemic-reminder, Zoom.
Zoom is a great alternative for live streaming events. Their codecs are fantastic, it works with smaller bandwidth than YouTube or Facebook, it’s not that expensive (even though it’s a subscription model), and despite the fact that they had people bombing strangers meetings for several months, they apparently solved that.
Is Zoom the perfect alternative? Well, for some people it might be. If you can designate a person to manage the live stream, mute guests as soon as they join, pay a monthly subscription for the extra seats in case more than 100 people join, and ask every one of your guests to download the app and open a Zoom account, then yes. Is it an easy solution? No way.
For us, at EventLive, Zoom feels like another work meeting. We tried it, and people just hated having to download an app and create an account to join someone’s event. And you know what happened? The young ones joined, but the elderly never saw it.
And what’s the point of live streaming an event if friends and family can’t see it?
That’s one of the reasons why we started EventLive: To bring people together in the most important moments of their lives, through a simple yet effective live streaming platform.
If you’re live streaming an event, our solution takes the hassle out of managing invitees. Simply send them a link and rest assured they will join on time. In any browser, with no downloads or accounts required.
Wait, is this a sales pitch? It’s really not. We’re not the only solution out there, but we’re confident that we’re the best in many ways. We won’t track you down to see if you’re playing music at an event (we truly hope you are). We’re not making your event public, and we’re not asking your client’s guests to take a mini-course in order to be able to watch their wedding.
Let’s assume you have a technical problem at one of your events (because trust me, if you stay in this long enough, you will have a few). We’re here to help.
Live chat? Yes. Email? Yes. Urgent phone call? We even had a bride calling us while wearing her wedding dress 3 minutes before the ceremony because she forgot her password.
We saved that day and many others.
What happens if you run out of space on your phone? EventLive will keep streaming.
What if you do have enough space? We’ll also save a copy of your live stream so you can use it later in case you need it.
What if you don’t have an internet because the piano concert takes place in the backyard? Remember that local copy I just told you about? When you get access to an internet connection and upload it, your guests will be notified and they can watch the event right away.
I could go on for days talking about how we made the platform so easy to use, anyone can do it. Wait, anyone? At different levels, yes. If you’re a Pro, we have RTMP and solutions for your professional gear. But let’s say you’re new to live streaming and you don’t want to deal with switchers, software encoders, and all that techie stuff… we’ll recommend you the simplest set up in order to offer a service your clients will love.
Since we’re talking about your options, let’s talk about gear.
The basics you need to start offering live streaming for events
We have clients that work with a very minimalist setup, and other ones who create a whole cinematic experience on the go.
This section is about explaining the basics you need, and then I’ll show you a few alternatives so you can choose which setup fits your events and budget.
Let’s start with video. In order to have a clean video signal, you can go live from either one of these options:
- Any modern smartphone: Great examples of this are iPhone 11, 12, Samsung Galaxy S20, S21, Google Pixel 4, 5, and so on. You don’t need the latest and best phone, but in this particular case, the more you spend the better the camera.
- Mevo, GoPro, and other cameras that support live streaming natively
- Hardware Encoder such as ATEM mini or YoloBox with Cameras connected
- Camera and a Laptop: A lot of modern cameras allow you to connect using a USB cable directly to a laptop. If your camera doesn’t allow you to do this, you need a camera with an HDMI output (Lumix GH5, GH6, Sony Alpha a6xxx lineup, Canon EOS R lineup, Sony a7 lineup, Nikon Z lineup, and many others) and a Capture Card.
Since you might be starting, the best way to try this is using your Android or iOS phone. Once you get the hang of how everything works, you can try more advanced setups.
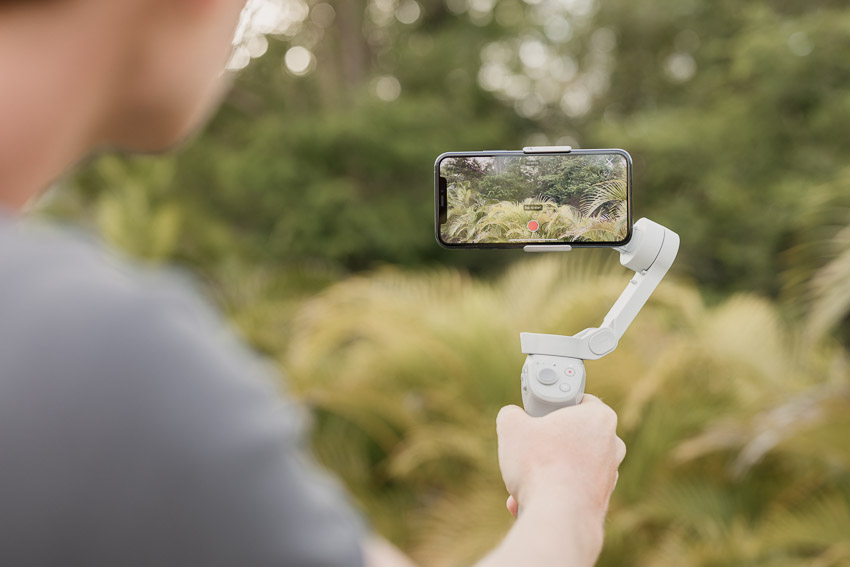
How to live stream events using your smartphone
Many of our clients run a full-time live streaming business with nothing but their smartphone, a mic, and a gimbal or tripod.
You will be surprised by how easy this setup is and how good the results are.
If you’re working with a stable internet connection and recording using a modern phone, the results are so good that it’s hard to differentiate them from the more expensive gear out there.
Let’s focus on two different options: a budget one, and one that requires a little bit of an investment.
Budget-friendly setup to Live Stream with your Phone
Which smartphone do you need to live stream events?
The one you already have. Don’t go out there and spend money on something you might not need.
Why? Because that money is better spent on things that are more likely to improve your viewers’ experience, like a microphone.
As you’re a videographer, I’m sure you already own one or two microphones, but just in case I’ll recommend a few that work particularly well for this setup:
- Rode VideoMicro Ultracompact: It’s the most popular one and for a good reason. It works flawlessly.
- Saramonic SmartMic Di Mini: It is an okay mic to start live streaming events on a budget.
- Synco WAir-G1-A1: This wireless mic will help you get much better audio quality with fewer cables. It allows you to place a microphone on a wedding officiant or a conference speaker with an affordable price tag.
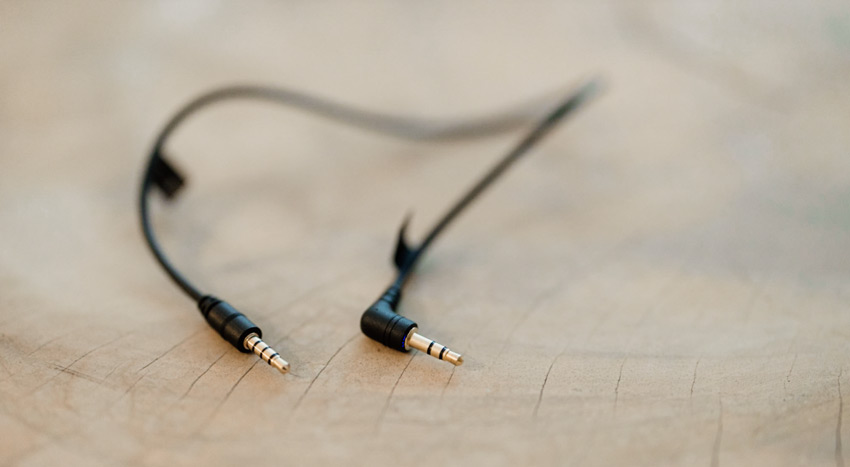
In case that you already have a mic, you might need a TRS to TRRS adapter in order to make it work with your smartphone.
What is a TRS to TRRS adapter?
It’s a small cable that allows you to connect a regular microphone to the headphone jack of your smartphone or tablet. How can you tell that the audio jack will work? It’s simple! smartphone/tablet microphones have three rings instead of two on the plug, like this:
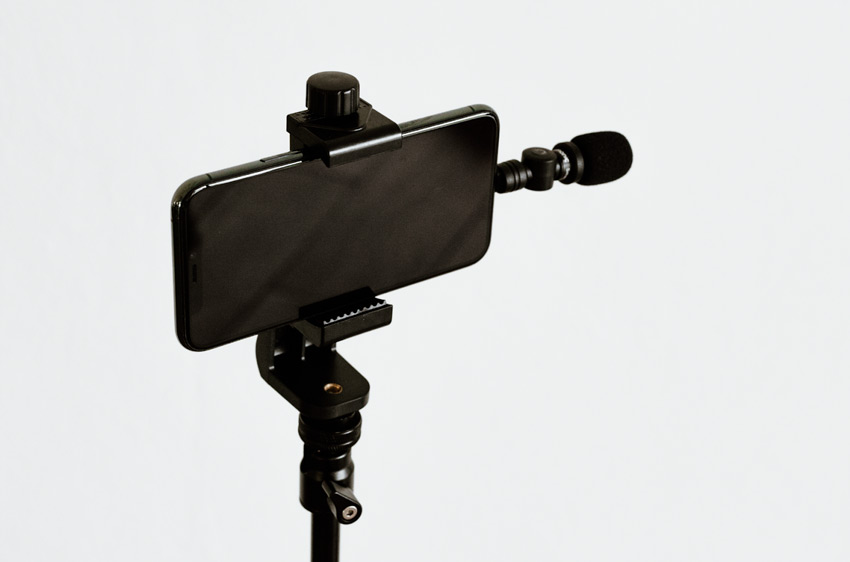
Now that you have a phone and a microphone, you will need a small tripod or light stand to keep your setup steady while you record.
Here are a few alternatives:
- Amazon Basics Light Stand: These ones are lightweight, easy to pack, and stay in place in mild weather conditions. It’s definitely not the sturdiest piece of gear, but it’s a very affordable solution that works for most locations.
- Impact Air-Cushioned Light Stand: This is a sturdier option that also features air cushioning to avoid sudden drops.
- Amazon Basics Monopod: If you don’t mind holding the setup at all times and really appreciate the flexibility, a monopod might be ideal for you.
In order to attach your smartphone to a tripod, you will need a simple adapter (you can get the cheapest one in this case as it won’t make a big difference):
Depending on the gear you chose, It should look similar to this:
Smartphone + Microphone + Tripod Mount + Tripod
What do you need to do next?
Install the EventLive app and test your event for free!
Assuming you’re interested in growing your live streaming business, I’ll also show you a few small investments that will improve the viewing experience for your attendees.
Recommended setup to Live Stream with your Phone
If you’re serious about live streaming events, you will need to invest a little bit to get the right gear. The amount of money will depend based on what you already have, but most of these items can be paid off with a single live stream sale.
This option is a lot easier to set up than professional cameras and it gives you almost the same quality at a fraction of the cost.
Recommended phones for Live Streaming events:
- iPhone 11 or newer
- Samsung Galaxy S20 or newer
- Google Pixel 4 or newer
- Huawei P30, P40, or similar
- Xiaomi Mi 11, Note 10, or similar
Now that you have a phone, let’s focus on audio.
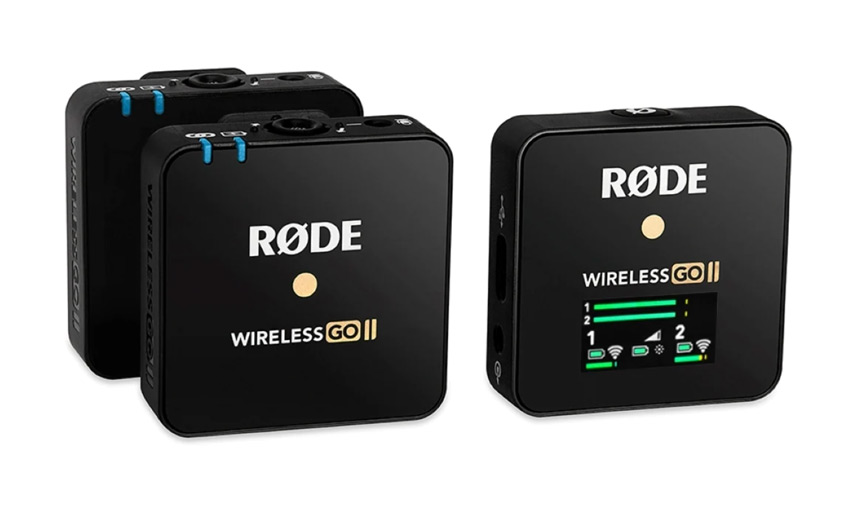
The best microphones for live streaming events are the Rode Wireless Go (for a single transmitter) and the Rode Wireless Go II (for dual transmitters, better range, and uncompressed audio).
Both of these systems allow you to record audio wirelessly and easily. If you don’t want the transmitter to be seen hanging from a jacket or dress, you can also connect a lavalier to it and hide it a bit more.
The downsides? They are a bit expensive and they can be very visible on camera if you don’t attach a lav mic to them
On the positive side, they come with windshields, the sound quality is superb and they have great battery life (about 7 hours on a full charge).
If you prefer other types of microphones, the Rode VideoMicro is a fantastic alternative. It provides great audio quality and allows for faster setup times.
What if you already own a microphone that works well for this kind of setup?
As shown in the budget-friendly setup, you’ll probably need a TRS to TRRS adapter to make it work. Since you might not be familiar with these adapters, you can find a quick explanation above.
Ok but… how do you put this setup together?
It should be fairly straightforward with the right tools.
Depending on the microphone you use, you might need a bracket to mount your mic next to your phone. Here are two options that should work well for most gimbals and tripods:
Once you figure out video and audio, the next step is to get a gimbal to achieve the desired smoothness on your shots.
You can choose a Gimbal or a Tripod, but here at EventLive, we find the gimbal + tripod combo the perfect fit for flexibility and smoothness.
Recommending a gimbal is very easy because they keep getting incremental updates and iterations every year. The model we can recommend is the one we own, the DJI Osmo Mobile 4.
It’s affordable, it’s lightweight, and it works.
Is it perfect? Not really, but it’s worth purchasing it.
Other alternatives are the DJI Osmo Mobile 2 (that allows for lower angles), the DJI Osmo Mobile 3 (lighter and more portable than the previous version) or the Zhiyun-Tech Smooth-Q3 (with an integrated video light).
I’d advise most people to get the DJI OM4 and ignore all the alternatives in this case.
Unless you get a gimbal, you will need an adapter to connect your phone to a tripod, like these:
Please note that to live stream events you will only need to use your phone sideways so even the cheapest adapter that stays in place will do. You can also get a hot-shoe adapter to mount the phone on top of your camera if that simplifies your process a little bit.
Do you have a tripod? If so, you’re set.
If not, I’d recommend you get any tripod legs (you don’t need a tripod head) that are lightweight and easy to set up. You don’t need a fancy tripod for this unless you’re live streaming in extreme environments (very windy locations or unstable terrain). Even a simple light stand will do.
What’s next?
The easiest way to start is to download the EventLive app and create a test event. It might take you 3 or 4 minutes and it’s free. If you need any assistance choosing gear, configuring yours, or even adapting the equipment you already own for live streaming, we love helping videographers like you getting started (no matter how geeky it might get sometimes!). Get in touch with us.
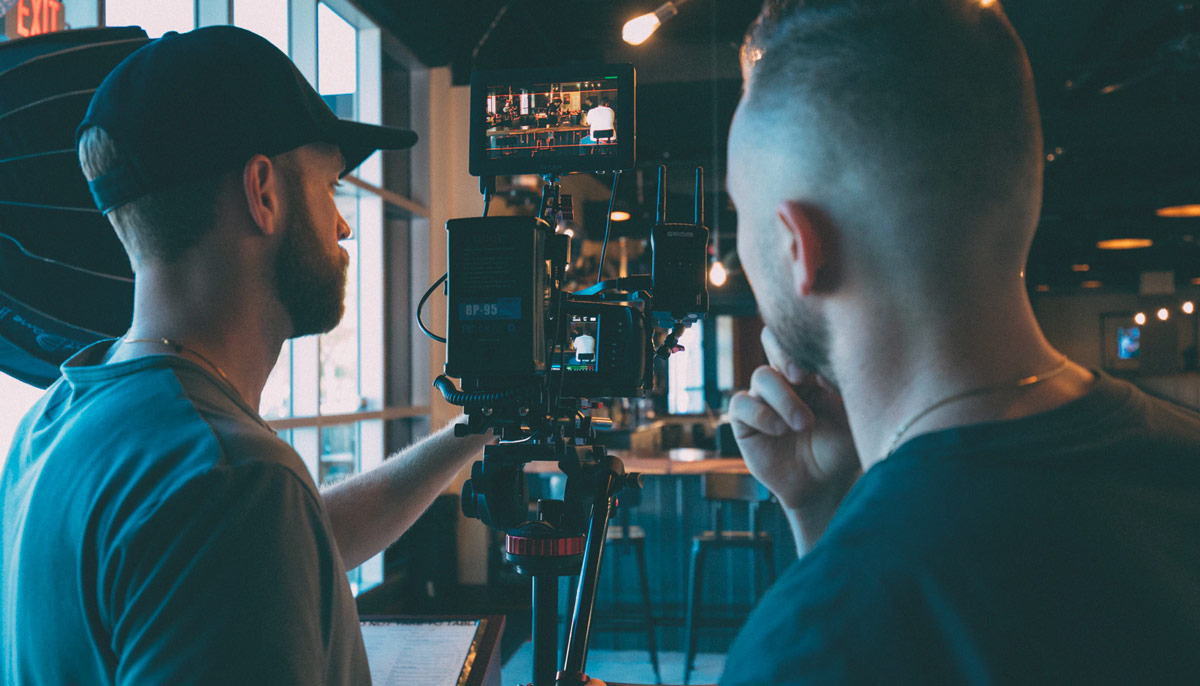
How to live stream events using your camera
I’ll show you how to connect your camera to a computer, hardware encoder, or Android phone in order to live stream events with a more advanced setup.
Let’s begin by checking if your camera would work using the USB port. The first step is to verify if your camera can act as a webcam. You can Google “your exact camera model + Webcam” to confirm.
Hopefully, you’re using a modern camera that allows you to connect it to a laptop and you’re almost ready to go.
In case it doesn’t work, you need to find out if your camera delivers “Clean HDMI” output. A quick Google search should give you that information (camera model + clean hdmi).
After doing that, simply look for a mini or micro HDMI port. Not sure about what the HDMI port looks like? you should be looking for something like this:
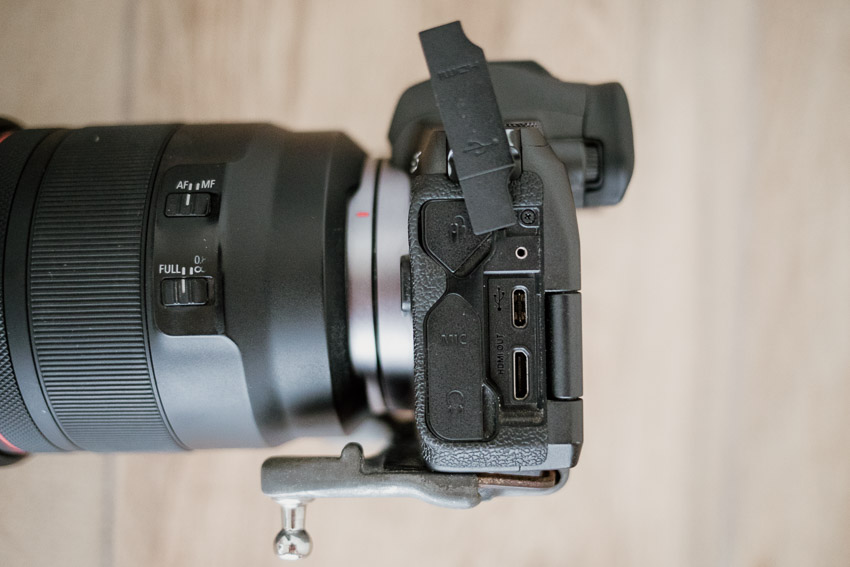
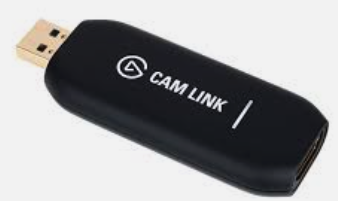
Assuming USB won’t work for you, you might need a Capture Card. It will allow you to connect your camera to a computer or Android phone for live streaming events.
In case you’re not familiar with them, a capture card is a small device that converts your camera’s HDMI signal to USB. It allows you to record with your camera and see it within a laptop or an Android phone.
You can find cheap capture cards for as little as 15 USD, or a pro version like an Elgato Capture Card for 125 to 160 USD. This is what it looks like:
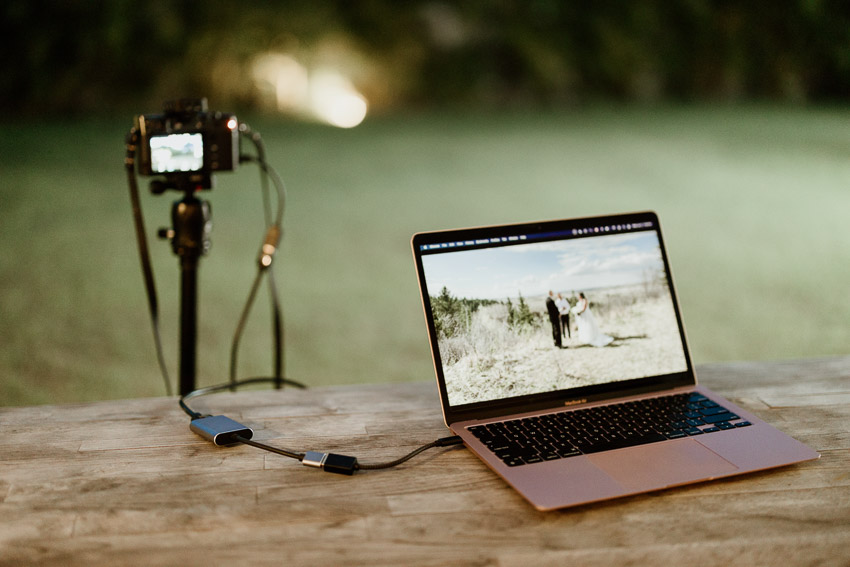
And this is what a simple setup would look like:
Camera > HDMI Cable > Capture Card > USB > Laptop
Remember: If your camera allows for USB connection, you can skip the HDMI cable and the capture card.
Now that you learned how to connect your camera to a laptop or phone, you will need a software encoder. OBS is the most popular option and for a good reason: It’s free.
OBS allows you to receive video from one or multiple cameras and send it to EventLive, YouTube, Facebook, or any other live streaming platform. All you will need is an RTMP address that we’ll provide as soon as you create your event.
Wait, what is RTMP?:
It’s a protocol used to send video over the internet. You’ll get access to your RTMP address on your event settings.
The best part about OBS is that it enables you to add creative elements to your live stream, such as slideshows, images, countdowns, pre-recorded videos, overlays, and so on. These are the little details that will make your live stream look more professional.
Just in case you’re feeling a little lost, let me show you how it works:
- Your camera connects to the Capture Card using an HDMI Cable.
- The capture card connects to a laptop (USB port).
- At the laptop, open OBS and enter the RTMP address that your live streaming platform will provide. If you’re using EventLive, you can find the RTMP address on the top right corner of your event page.
- Choose your camera and press Start Streaming once you’re ready.
Assuming your camera allows you to use the USB port instead, you can ditch the HDMI cable and the Capture Card, which makes the whole setup even easier.
If you’re new to this don’t panic, we offer unlimited free tests so you can try this as many times as you need before attempting this at a clients’ event. And if you ever hit a wall, reach out to us. We can even guide you over the phone.
Can you live stream with other cameras?
Yes, definitely. GoPro and Mevo cameras are also an option, as well as webcams connected to laptops and many other solutions. If you don’t know if your camera will work, feel free to get in touch with us at support@eventlive.pro. We’re here to help.
How to get great audio for live streaming events
The next thing you need to solve is audio.
This is the biggest problem for amateurs, but something very easy to solve for videographers.
As you already know, watching a great quality video with poor audio is worse than a lower quality video with great audio, especially when it’s a live event.
Getting clean audio can be a little bit tricky if you don’t have the right equipment, so let’s go over the basics. You will need a mic to get great results (unless the venue is really small and quiet and you're close to the action).
Wireless microphones are the best alternative, but there are cheaper options that work just fine for most events. They sell for as little as 39 USD.
There’s an easy solution I recommend to everyone looking for great build quality, superb audio, 7-hour battery life, and reliability:
- Rode Wireless Go (Single Transmitter)
- Rode Wireless Go II (Dual Transmitters, Better range, Uncompressed Audio)
Both of these allow you to record audio wirelessly and easily. If you don’t want the transmitter to be seen hanging from a jacket or dress, you can also connect a lavalier to it and hide it a bit more.
Wireless microphones are expensive and they can be somewhat visible on camera unless you’re using a lavalier attached to them.
Supposing that you already own a few microphones or that you’re on a tight budget, you can also opt for more affordable alternatives like these:
All of those alternatives should give you a great starting point, but the quality of your audio will vary greatly depending on your location, wind conditions, distance from the event, and so on.
Getting steady footage while live streaming events
Last but not least, you will need a stabilization system.
You can choose between a tripod, a gimbal, or a combination of both.
Let’s say you don’t want to hold a gimbal during the event or walk around as you live stream. In that case, a tripod will be a better option for you. There are hundreds of great options for this and they all serve the exact same purpose.
As a videographer, I’m sure you already own a few tripods for your cameras so there’s no need to recommend any specific models here… but what about gimbals?
You can’t go wrong with either one of these:
- DJI Ronin-S: It’s perfect for bigger cameras and lenses up to 7.9lbs or 3.6kg.
- DJI Ronin-SC: A budget option for lightweight cameras up to 4.8lbs or 2.2kg. It doesn’t work well with big lenses as it loses balance.
- DJI Ronin RSC: This is the improved version of Ronin-SC, 50% stronger. It’s great for mirrorless cameras up to 6.6lbs or 3kg.
- Zhiyun-Tech WEEBILL-S: A great alternative to DJI’s offerings. It’s a little bit smaller and with a less durable construction, but it’s also very stable and more affordable.
Pro Tip: If you’re feeling creative, you can combine a gimbal and a tripod for extra flexibility!
Now that you have most of your gear ready, let’s focus on the only thing you can’t live stream without, an internet connection.
Internet requirements and solutions for live streaming events
The most important aspect of your live stream is that it should be enjoyable for guests at home. That’s the whole point of sharing the event, isn’t it?
You can get a better phone, camera, or even spend on a professional microphone... but the biggest quality improvement will come from a stable internet connection.
Here are some of the basic things to keep in mind when preparing for your first event:
- Do not rely just on the venue’s WiFi.
Guests can show up and cause interference, or vendors and employees might use up the bandwidth and you’ll end up with a lousy upload speed. - Consider the distance
If you are outside of the venue or away from the router, the WiFi signal will be worse the further you go! When working outside, LTE is usually the better option. - Bring your own backups
Getting an internet package for your phone is always the easiest solution to most common problems. If you can get a hotspot, your chances of getting a great signal are almost guaranteed. The industry standard is the Netgear Nighthawk, but if you can’t afford to spend that much, there are other alternatives out there. - Combine internet connections
- When streaming from your phone, consider using an app like Speedify. It allows you to use both WiFi + LTE at the same time (this is called bonding, in case that you decide to look for alternatives). Even though Speedify isn’t free, it might be worth paying for if you run a live streaming business.
- When streaming from your camera in locations with very bad internet, consider LiveU Solo. It enables bonding and it works very well. - Verify your connection before prime time
Check which carrier has better reception at your venue(s) At&T / Verizon / T-mobile / Or the ones available in your country. - Verify your data plan
Make sure to know how many GB they include until they cap. Even if they say Unlimited they may reduce speed after X GB. - Calculate how much data you will need
EventLive’s phone app uses 1 GB per hour in HD (720p at 2mbps).
At 1080p with an bitrate of 5Mbps, you would use 2.5GB per hour of live streaming. - Verify your Internet connection
Simply open the EventLive app at the venue using LTE or WiFi. Compare both options to see which one shows the “Good signal” vs “Poor Signal” prompt on your screen. - Verify your upload speed
To measure your internet speed you can use the SpeedTest app, or visit fast.com in your internet browser. Please note that the minimum requirement for streaming is 2Mbps of stable upload speed.
Does it sound like a lot?
It might... but these are all solutions to common problems you might face at a venue. It’s good to understand how they work so you can solve anything that comes your way.
To simplify things a bit, here’s a brief summary:
- Have 1 or 2 sources of your own 4G - phone, hotspot or router, preferably different providers!
- Knowing where your routers are matters. If you don’t have clear sight or bad signal, try changing positions.
- Test venue’s WiFi and your 4G sources before the event. Choose what's best and be prepared to switch if it worsens.
- Make sure you have enough data on your carrier’s plan
- In hard remote areas consider adding backups, or bonding solutions!
Depending on the type of events you’ll stream, you will need different pieces of equipment.
In most cases we find that a good LTE connection works great for most environments. No matter what, we still recommend you to have a backup plan, just in case.
Now that you understand how to set up your gear, solve common problems and provide a service that simply works, let’s focus on your business.
If you know how to market your service, you can be successful at live streaming with even the most simple setup. Now let’s talk about how to improve your videography business.
Here's how to improve your customer experience
It’s no secret that clients care about the quality of your work.
But… are you aware that 92% of your customers care more about your service than the final video?
You should. Product quality actually comes fourth, after Customer Service, Support, and Ease of doing business.
As a videographer, I’m sure that you spend a lot of time trying to improve your edits, your sound, researching gear, and striving to provide the best quality video you can create. And that’s fantastic, but it’s not enough. It’s not even the top priority.
One of the main reasons videographers choose our platform is because of its features. It’s usually not about privacy, or even about simplicity. When we asked our streamers what their clients’ reaction was, we received a fairly common answer:
They love the viewing experience.
Others said that they like the fact that they can download the video, and that they’re even using it as a delivery platform because they can add their own logo and branding on it.
Do you want to go the extra mile? You can even build a page on your website and embed a live stream right there, in order to keep the viewers on your own site.
Even the videographers who had problems with the internet connection at their venues were able to upload the video 10 minutes later with the copy stored on their device. And you know what? All of the attendees got notified as soon as that happened.
Choosing a platform that works for you adds value to your brand and promotes your business even while you’re editing (most of our clients watch their recorded live stream the very next day while they wait for the edited version).
To conclude, here are a few things we’d like to recommend you to grow your videography business:
- Focus on what matters. Are you familiar with the 80/20 rule? 80% of your results come from 20% of your actions. If your clients care about the service, give them an experience to remember. Don’t focus too much on gear or complicated stuff.
- People love personalized experiences. They don’t want to download apps, or strangers viewing their intimate moments. They want privacy, a service that works, easy solutions, and they’re willing to pay for all of it.
- Simplicity wins. Adding services might feel overwhelming at first, but many live-streaming professionals are using an iPhone with a gimbal and a microphone. There’s no need to complicate things when the quality for guests at home is almost identical. All your clients want is their attendees to be able to enjoy the event.
- Don’t be afraid to adapt to an ever-changing market. Live streaming is here to stay. Don’t wait another year until all your competitors have the market for themselves.
I hope that you learned enough to try live streaming today. I promise it’s easier than it looks on paper. Give it a try.
If you have any questions or you find any of this overwhelming let us know.
We’re a small team of people passionate about live streaming.
We’ll guide you through the whole process so you can add live streaming to your packages or services, and provide a customer experience your clients will love.